Weaving step by step. Selvedges – miracles on a stick
Every now and then someone asks me how to weave. Sometimes it's just a little advice, sometimes someone wants to know how to start, and sometimes someone wants to know everything 🙂 You can find a lot of interesting information and videos on the Internet. However, there seems to be a lack of materials in Polish. I decided to write an instruction manual for those interested in weaving. It's done entirely in my own way, and since I don't have any pedagogical training, I'll gladly accept any comments or questions. I'll then be able to add to the issues that raise doubts. I didn't record a video and I don't plan to for now. There's a lot of text here, so I didn't add any photos in large formats. Photo-instruction it's already on picasa.
Selves can be woven using different techniques and different tools. I usually use a bardka. It is a small loom, or rather a weaving board. However, there are no finds of this tool in our lands. I once read (probably in a book by Witold Hensel – a footnote is needed) that a half-harness and a few sticks were probably used to weave selves. Looking at the few textile artefacts, I cannot resist the impression that this was the case. The technique itself imposes the pattern – it is easiest to make stripes lengthwise using it. In addition, the pattern does not have to be symmetrical. As an example of asymmetry, I will give a selvedge with Opole and with Skjoldehamn.
So today I'm going to show you how to start weaving if you don't have a bard.
Required items:
– 3 peeled sticks, about 0.5 m long (mine are a bit shorter)
– 4 short peeled sticks, 10-15 cm long
– thin, smooth string, e.g. cotton, linen
– a few stronger, thicker strings
– something to tie the work to itself: tape, belt, rope – I have it "backstrap"
-yarn
– possibly scissors 🙂
Design
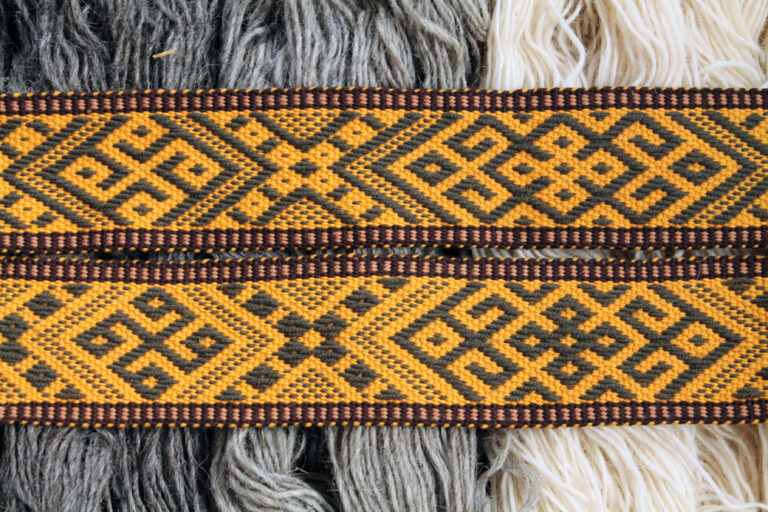
I chose the pattern of the selvedge based on a find from Opole from the 3rd quarter of the 11th century. The description is in the book Early Medieval Textiles from the Excavations in Opul / Jerzy Maik. – Łódź, 1991. The original is made of wool in a 1/1 weave, is 2.5 cm wide and has stripes in the following order: red, yellow, black, yellow, red. There is no information about the proportions of the stripes, the number of threads and their thickness. Instead of red, I chose red, and replaced the black with dark brown. I decided that the stripes would be of the same width, 6 threads each. So the selvedge has 30 total threads with a thickness of 330Tt. The target width – any, whatever comes out.
Warp
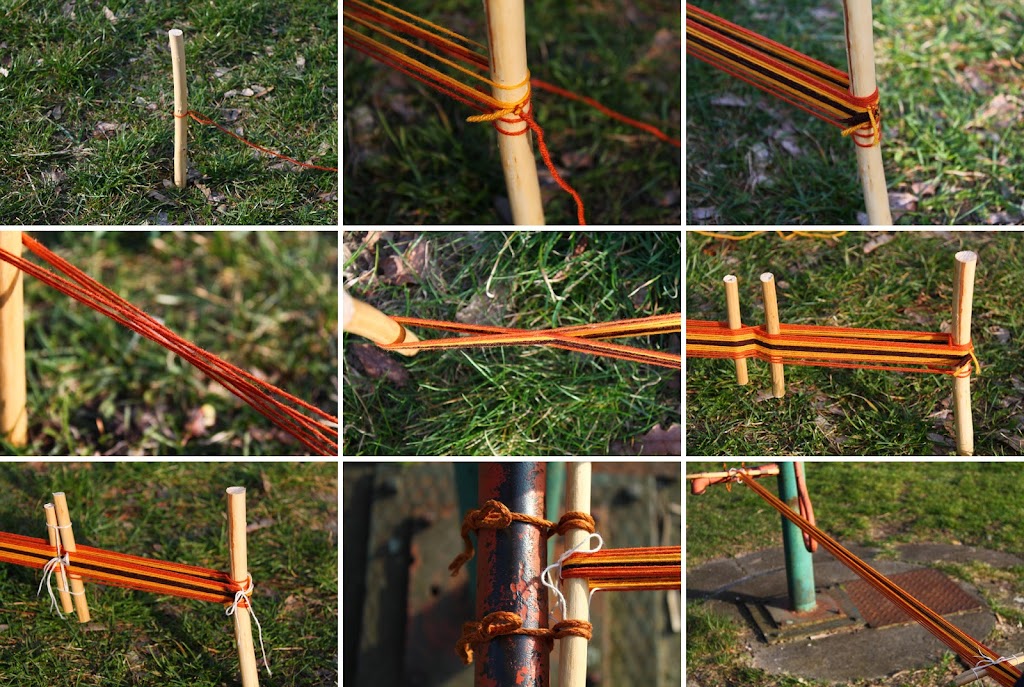
2 long sticks should be firmly driven into the ground. In my case, the distance between them was about 2 meters and this is the length of the warp. The selvedge will be less than 1.7 m. Some of the warp will be lost at the beginning and end of the selvedge – this will create fringes or waste. You have to take into account that during weaving, some of the length of the warp will be worked into the resulting fabric. So if someone plans a specific length of the selvedge, you need to add a little to the warp… e.g. 0.5 m.
Creating a warp starts with tying the end of the yarn to one of the sticks. Then you need to lead the thread to the second stick, wrap it around it and return to the first. The warp thread should be led in such a way as to create a figure eight. One loop is 2 threads in the selvage, one in each row.
Since I wanted each strip to have 6 strands, after making 3 orange loops, I tied the end of the yellow yarn into a knot and ran 3 loops again, this time yellow. Then the brown thread took part and again 3 loops. Then I used yellow again and the whole thing was crowned with 3 orange loops again. I tied the end of the yarn to the first stick.
If someone wants to have an odd number of threads of a given color, there's nothing stopping them. You can also change the color with this second stick.
When creating the warp, you need to pull the yarn evenly. If each thread is equally tense, the fabric comes out evenly.
Because each loop is in the shape of a figure eight, the warp threads cross. This is a very important fact – it will be useful for making a half harness, and then for creating two weaving sheds.
Once we have measured the warp, we need to take 2 short auxiliary sticks, place them near the intersection of the threads. If there are any doubts about the shape of the figure eight itself and it is difficult to recognize which thread goes where, it is worth placing a shorter stick in a loop near the long stick and pulling it along the warp. Thanks to this, the threads will comb out and arrange themselves logically 🙂 We tie the auxiliary sticks together to secure our precious intersections. An additional tie must be made for each long stick. Even if the nasty gravity tears the resulting warp out of our hands, nothing will get tangled. You can tie not only the threads themselves, but also attach them to a stick.
On one of the long sticks, you need to tie loops of thicker strings - one loop below the warp thread, the other above. These strings will attach the warp to some stable object. It is worth attaching tape to the second stick now, which will be used to tie it to itself.

Weaving in such a way that the beginning of the warp is tied to the weaver and the end to a stable object is simply convenient. The warp must be well tensioned. With your own body, you can minimally adjust the tension force during work. When opening the shed, you can lean slightly. Of course, you can also permanently tie both ends of the warp, e.g. to a special frame (found in iconography in the shape of a carpet beater) and weave sitting on the side of the selvedge.
However, I prefer tying at the waist and weaving the selvedge in front of me. In addition, weaving towards me, which means that in turn there is me, the newly created selvedge, the shed, the weaving tool, the free tensioned warp, and that's it. Some people prefer to weave away from themselves - that is, they tie the warp at the waist, then there is the tool, the shed and the emerging selvedge. These people have to stretch their hands out in front of them, tie the warp every now and then and tighten it anew each time. For me it's a nightmare, but some people like it - I'm not stopping them 😉
Now that everything is tied and secured, it's time for a delicate operation. The sticks need to be pulled out of the ground, moved, and tied to something. My stable object was the well, and I tied the final stick to it. I attached the initial stick to myself using a backstrap I made a long time ago.
Weaving mechanism – half-harness
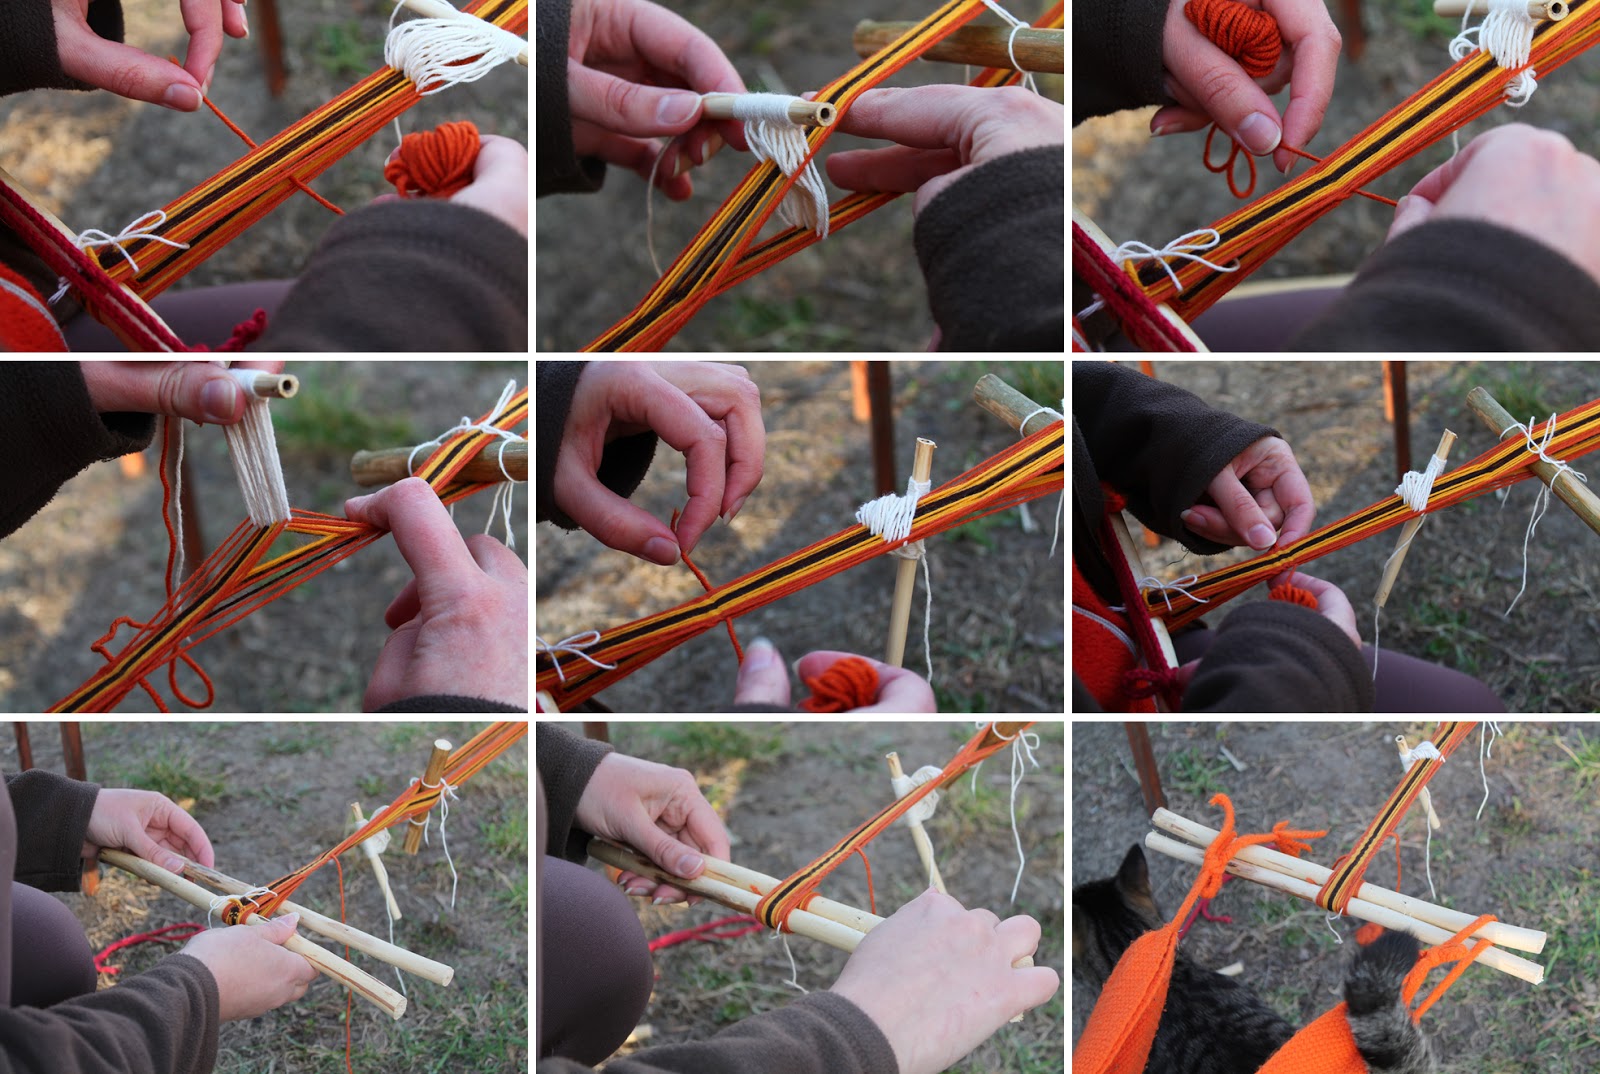
Now it's time for the half-harness. You can prepare it according to what Laverne Waddington showed. I wrote about it already long time ago – there is also a video with instructions on how to do it. What's more, the author makes really excellent weaving instructions.

You need to take a prepared thin, smooth string. It simply needs to be quite slippery so that it doesn't catch. The end is put through the gap between the warp threads (right next to the auxiliary stick that is closer to us) and tied to stick no. 3. Then you pull the thread out from between the warp, create loops and tighten them. A half-harness is gradually created on the third stick. No knots are made and you can freely correct the length of the loops. Each warp thread must be separated, and if you make a mistake, you can easily unravel the piece, undo it and start over. Finally, you make a few more loops, cut off the excess and tie the ends of the string so that they don't get tangled.
On the other side of the intersection of the yarns in the warp, we add a thicker stick and secure it with a string so that it does not fall out during weaving - threads tied at each end and connected to each other at the top and bottom.
Now you can remove the 2 auxiliary sticks. The valuable crossing has fulfilled its function of holding the threads in the right order and is now secured – the half-harness remains on the warp, creating one shed and a thicker stick for the second shed.
Weaving
It takes a while to get to the fun part where fabric is created. The weaving itself is nothing more than interlacing the weft between the warp threads. The weft and warp are perpendicular to each other and create a mesh – the threads in the places of contact are alternately on the top or bottom. This is of course a simple, abbreviated approach.
The warp threads in the simplest version, in a plain weave, are arranged alternately – when you look from the side, you can see 2 layers of yarn. The space between the layers is the shed. The weft thread runs in the shed. Each weaving construction is used to change the places of the alternating warp threads to create at least 2 sheds.
The starting position is such that the thread intersection is between the half-harness and the thick stick. The half-harness is up, and below it is the first shed. Just put the weft thread through it.
Next, you need to swap the warp threads – to do this, you spread the threads starting from the side of the thick stick. The loops of the half-harness move freely down between the warp threads. Looking from the side, you can see that the crossing of the threads has changed position – it should reach resistance, the weft itself. This creates the first row and the second shed. Again, we pass the weft through the shed and tighten it. The free end of the weft can also be passed through the shed – this is an ideal way to protect the beginning of the fabric from unraveling.
At this point, you need to pull the half-harness up, while simultaneously pressing the entire warp with your hand (placed crosswise between the half-harness and the thick stick). Again, you need to pull the threads apart and pull them to the weft itself. This way, the second row is created and the initial position is returned.
Now all you need to do is repeat the weaving steps, each time elegantly and precisely pulling the thread and tightening the individual rows.
Once you have created a piece of new selvedge, you can take a third long stick and use it to wind the effects of your work. Place it under the selvedge, close to the first stick. You can even tie the sticks together for safety. When you twist them together, the finished selvedge cleverly winds itself around them. Properly putting the ends of the tape through the sticks means that the wound selvedge will not unwind during work.
If you run out of thread, just add another one without tying knots - simply weave one or two rows with a double thread. A row with a double thread is created a bit wider. It is worth pressing such a row much tighter, and then the difference decreases. You can also bend the ends of 2 threads and loop them together. The protruding ends are simply cut off. For exceptional aesthetes, there is such a solution: connect the ends of the threads together as you would spin or make dreadlocks.
The end of weaving occurs when the length of the thread does not allow for free change of the half-harness position and creation of sheds. It is worth passing the free end of the weft through the previous row (or two) with a needle. The half-harness is easy to pull off, because since there were no knots, nothing needs to be untangled. Just unmount all the sticks, end the free threads to your taste and enjoy the results.
Summary
The described weaving tool is very simple, easily accessible and cheap. There is little or no yarn waste if fringes are made at the ends of the selvedge. Because the warp is created in a stretched form, nothing needs to be combed and arranged. Even at the stage of winding the yarn, the important even tension of the warp is taken care of. In this way, any width of fabric can be created. However, I recommend starting with a narrow selvedge and gradually increasing the level of difficulty. The disadvantage of this technique is that the yarn in the warp can catch, because the threads are really close together. It is worth choosing smooth woolen yarn or cotton to start with. Instead of sticking sticks into the ground, you can use other stable elements, e.g. a table placed upside down is good.
It's a pleasure to read such clear instructions, I will definitely try it. Best regards, Ewa 🙂
Great tutorial 🙂 Now all you have to do is find time to try it out.
Excellent tutorial. Your pictures are very clear, and even though I don't understand Polish, I was able to follow along. I love your blog.
Thank you. I know that you mentioned on your blog that I write tutorials. I decided to finally make one 😉
Language of weaving is international 🙂
Thank you for your comments. I think I'll just enlarge the photos and slowly prepare for the next instructions 🙂
We saw each other today in Biskupin. The blog is interesting, the tutorials are clear. The reasons why I put off my weaving fantasies until "later" are ending.
There will probably be more tutorials – in Biskupin I will document my work and then publish it here. I am glad that I could help – I wish you much joy in weaving 🙂
Do you have any instructions for weaving selvedge using a bard?
In fact, what I would most like is some clear instructions on how to arrange the threads when we have a pattern on the selvage other than stripes along it 🙂